
Having an online shop implies a different strategy for showcasing your items. You cannot win people over with wit and charm. So your personality has to come across through:
- photos
- descriptions
- titles
- banner and avatar
- and all other details
In keeping up with notes on my experience about getting the shop started and successful there will be a few on how to make the most of your photos. The beginning of our joint venture implied mom taking photos and me cropping and editing them. This was not the ideal setup but we are living in different countries at the moment and this was the only thing we can do. Anyway considering the photos’ quality was not what we wanted we had to do the best with what we had. Future plans include better photo sessions in the meantime we power through.
I found that it helps adding a nice border in Photoshop to the item. While there many examples online on how to add a frame to a photo I will give here just a few quick steps of what I have done. Certainly you can look at complex and beautiful frames but the choice I have made for the photos so far was to choose relatively simple frames because the focus should be the item and a complex frame could distract the attention of the viewer. Hence I made the choice for a one-color outline, either a color sampled from the item itself, or a single color such an elegant black .
Steps:
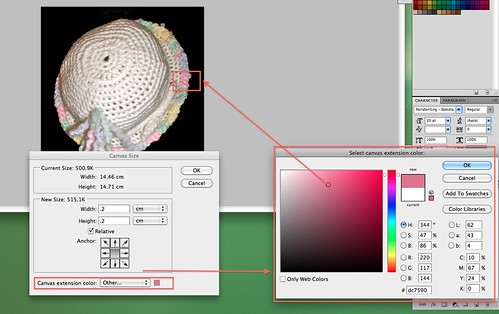
- 1. Open Photoshop.
2. Edit your photo: crop unnecessary parts of the photo or add more light if possible.
3. Once finished then go to the “Image” Menu and choose the “Canvas Size” option.
4. Depending on the size of the image you can choose how much you want to increase your canvas. For example the photo I choose has width : 425 and height 432 pixels. The choice of canvas increase to look as shown below is 7 pixels.
5. The properties in the “Canvas Size” window should be as follows:
-
- a. Width and Height.
b. Relative. This will allow you to add the suggested border relative to what you already have on your canvas. You can use the arrows if you want to add a border only in a certain direction.
c. Canvas Extension Color. You can choose a preexisting defined color from the dropdown or you can choose Other. This is what I normally select in order to choose a color from the item itself. This helps focus the overall image toward a specific theme color.
d. Use the Eyedropper tool to select a color from your item.
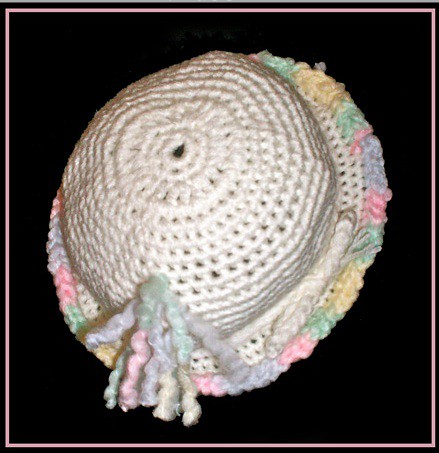
Some item photos allow for a simple black border, some allow for a nice triple border: one color from the item, white or another neutral background color, another color form the item.
This has been a nice quick way to make the photos more elegant in some cases. Like anything it is a matter of trying and see how it looks. Photoshop can be a very intimidating tool but it can be a mountain that can be climbed if done in very small steps. I am not a professional but I feel I am learning more and more with each task or goal I set for myself. As well there could be similar results with other tools so as long as you can start somewhere it doesn’t really matter how you go about it.
Happy Etsying !!!